Background
Before creating this blog, I tried various methods to set up a personal blog. Initially, in my eagerness, I attempted to learn frontend technologies to build a website from scratch, but that effort ended in failure. After that, I used static site generators like Hugo and Jekyll to write blog posts in VS Code and deploy the generated static resources on GitHub Pages. However, this approach also didn’t last long.
Reflecting on why the blog didn’t endure, I realized that I was overly fixated on the technical aspects needed to build the blog. In doing so, I neglected the essence of the blog: writing consistently. Without a clear intention about what I wanted to write, it was unlikely that I would find the time to do so. Moreover, writing in a code editor felt more unfamiliar than expected, and my lack of familiarity with Markdown made the process less accessible.
Currently, I use Obsidian primarily as my digital notebook and a tool for bullet journaling. This has significantly lowered my psychological barriers toward taking notes compared to before. With this in mind, I decided to set up a blog again, seeking an approach based on Obsidian, which is the tool I’m most comfortable with today.
Introduction
Obsidian offers a service called Obsidian Publish, allowing users to publish the contents of their Vaults. While it enables you to create a personal blog or a knowledge base website seamlessly with minimal effort, some users have commented it for being slow and for requiring a subscription fee. This has led me to explore alternative solutions.
Finally, I discovered the existence of a tool called Quartz through a YouTube video. The video explains how to use Obsidian in conjunction with GitHub Pages to build a personal blog. I immediately gave it a try, and the results were satisfying.
This post illustrates how to configure your own publishing platform with
- Obsidian (as a markdown editor)
- Quartz (as a static site generator)
- Github Pages (as a hosting service)
How it works?
To create a website, it’s necessary to generate static resources that can be rendered by a browser. How does my markdown notes turn into the static resources?
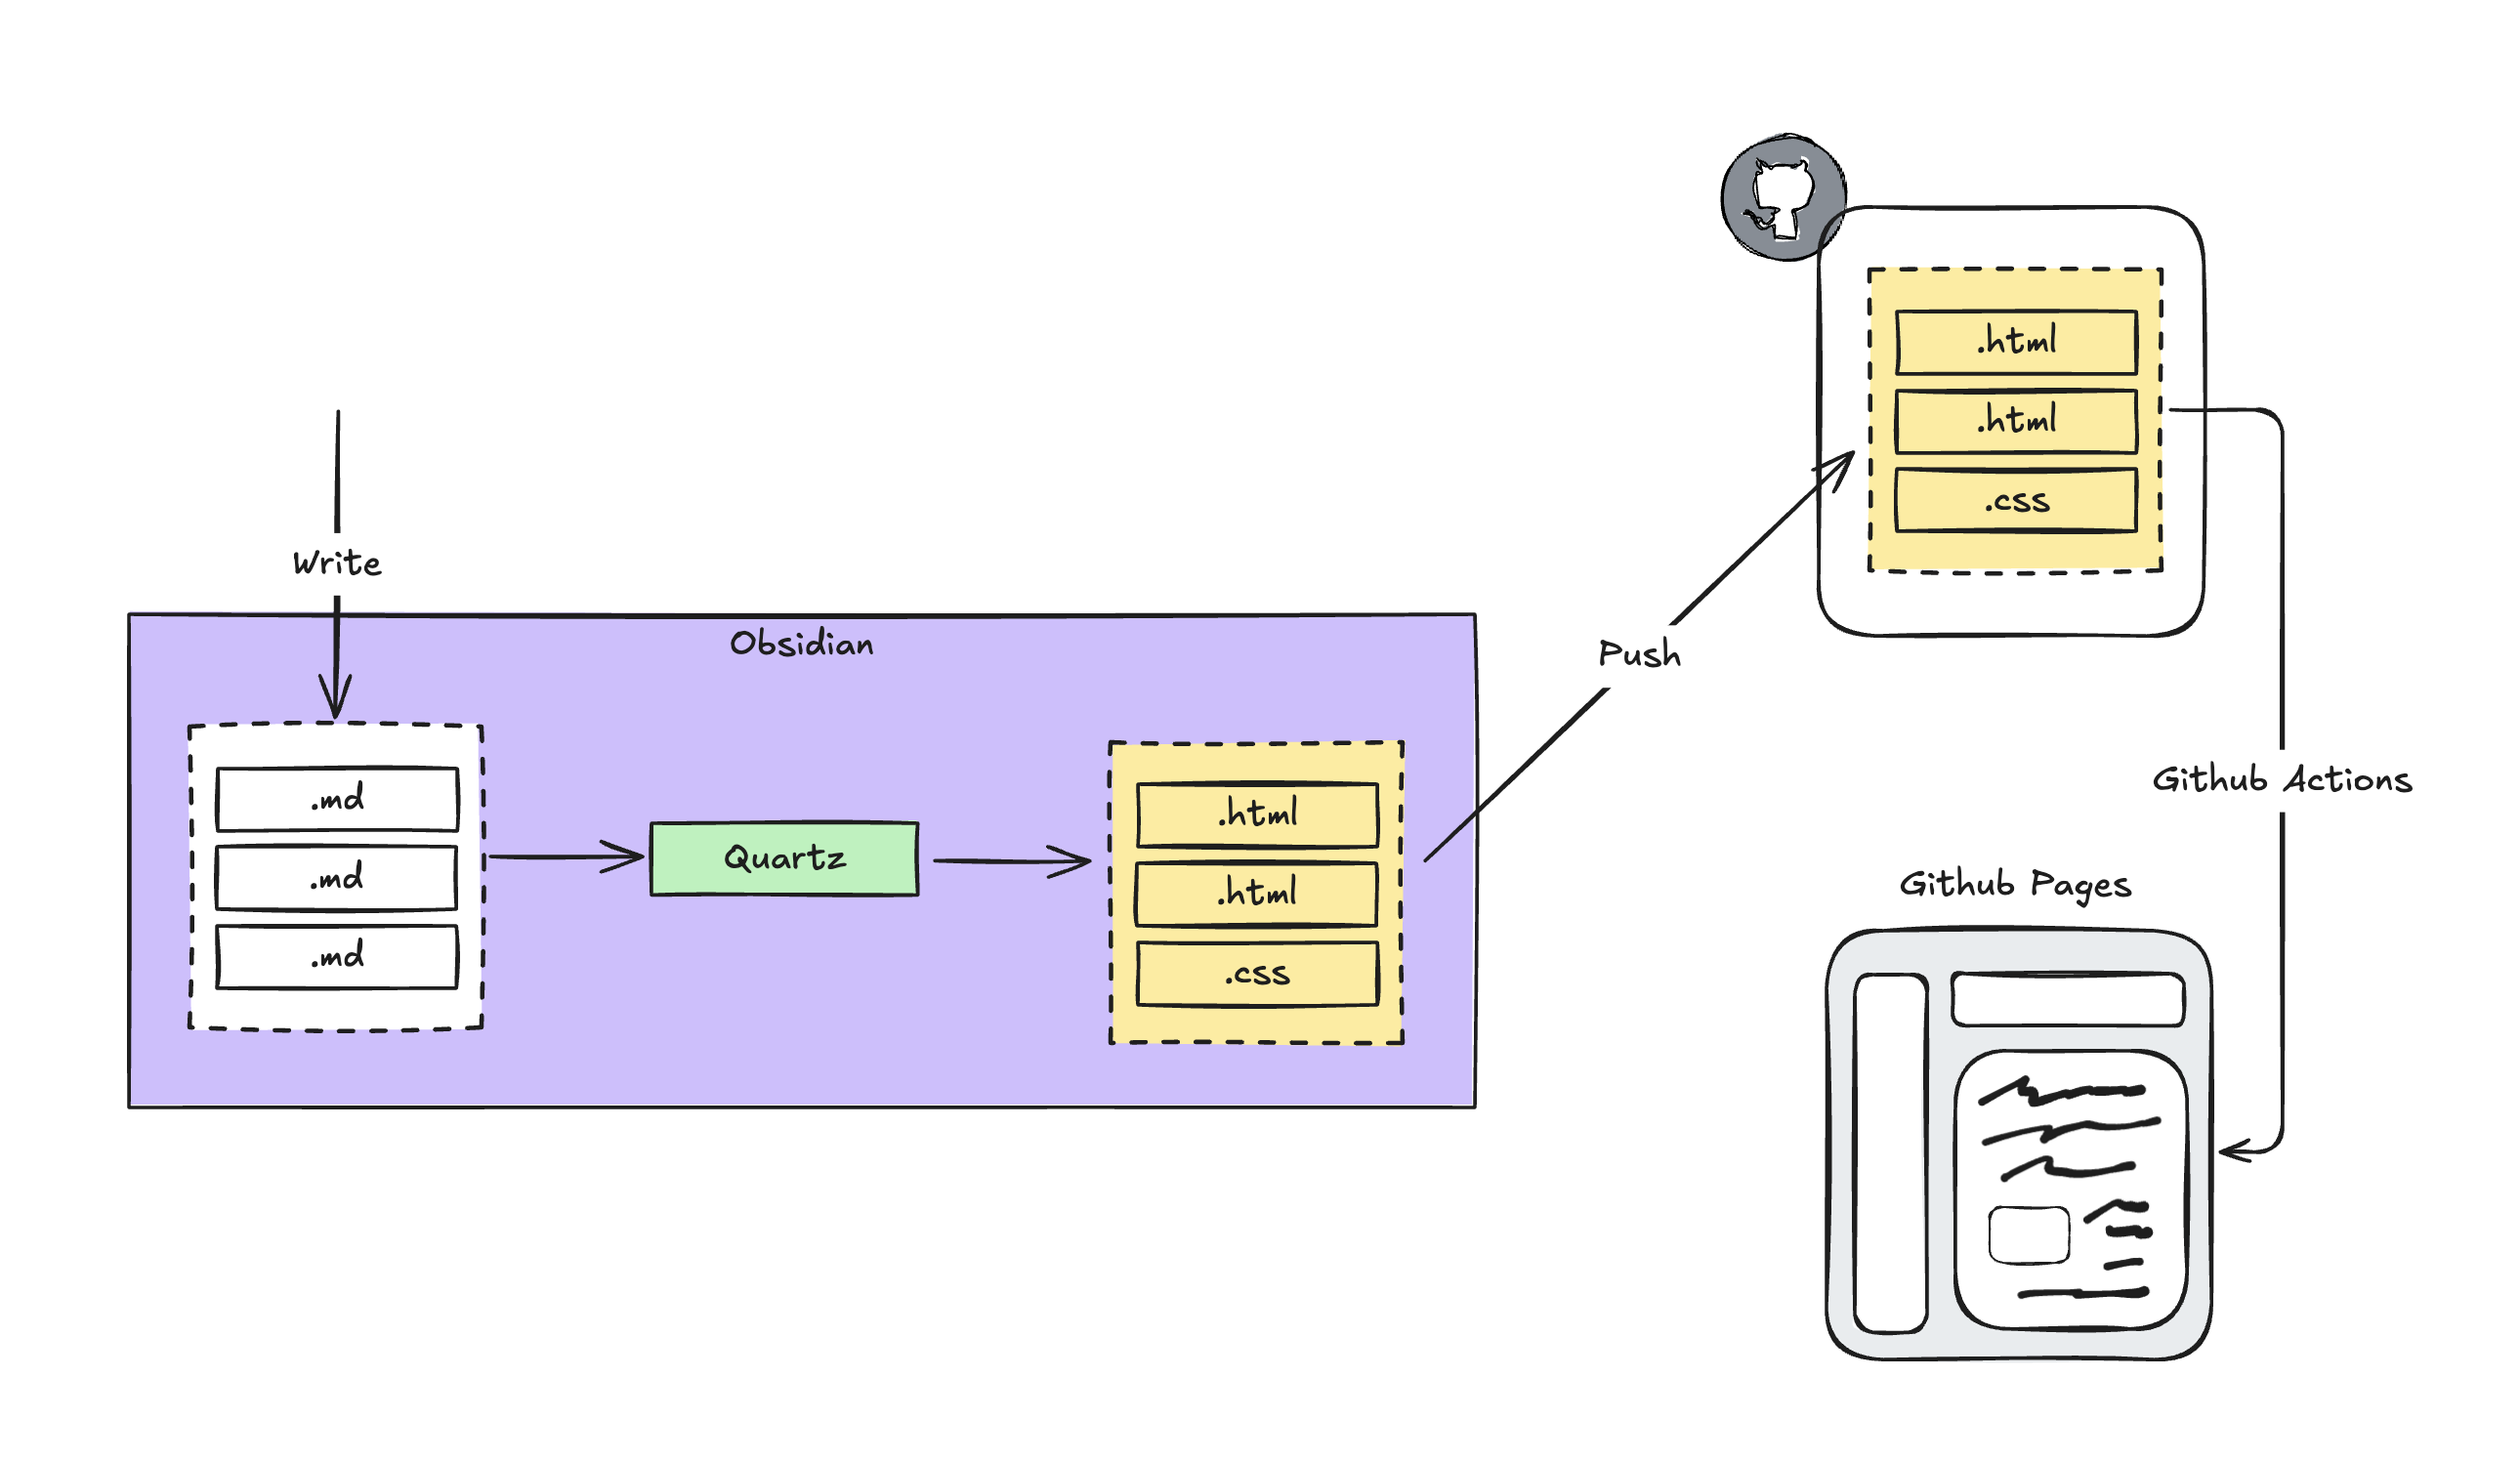
In short, Quartz converts Markdown notes created in Obsidian into these static resources, while GitHub Pages hosts these resources, eliminating the need for individuals to set up their own servers.
How to configure Obsidian + Quartz + Github Pages
For the most up-to-update manual, please refer to this link and this Youtube video
0. Requirements
1. Install Quartz
$ git clone https://github.com/jackyzha0/quartz.git
$ cd quartz
$ npm i
$ npx quartz create
┌   Quartz v4.5.1
│
◆  Choose how to initialize the content in `[YOUR_DIRECTORY]/quartz/content`
│  ● Empty Quartz # Choose this if it's your first time
│  ○ Copy an existing folder
│  ○ Symlink an existing folder
◆  Choose how Quartz should resolve links in your content. This should match Obsidian s link format. You can
change this later in `quartz.config.ts`.
│  ● Treat links as shortest path ((default)) # Choose this if you use Obsidian
│  ○ Treat links as absolute path
│  ○ Treat links as relative paths
└  You're all set! Not sure what to do next? Try:
  • Customizing Quartz a bit more by editing `quartz.config.ts`
  • Running `npx quartz build --serve` to preview your Quartz locally
  • Hosting your Quartz online (see: https://quartz.jzhao.xyz/hosting)
If you look at the structure of Quartz directory, you would see like
quartz
├── content
│   └── index.md
├── .quartz.config.ts
├── .quartz.layout.ts
├── ...
└── node_modules
    └── ...
contentis where you put your markdown notes and Quartz will convert them to static resources..quartz.config.tsand.quartz.layout.tsare configuration files, and we’ll cover them in following series.- Note: You can use your own name for a Quartz directory
git clone https://github.com/jackyzha0/quartz.git [YOUR_DIR_NAME]
2. Set up Github Repository
You can refer here and just make sure NOT to initialize the repository with README.md, license, or gitignore files.
3. Set up Obsidian Vault
At this step, there isn’t much to do besides opening the Quartz folder in Obsidian and making sure it is recognized as a Vault folder. Since this is a tool for writing blogs, you might want to install community plugins that can assist in writing or customize the setup to your liking.
4. Sync to Github
Currently your vault is same as quartz directory, which is configured with Git. To make your vault sync with the repository you created at 2, set the origin to your repository.
$ cd quartz
$ git remote -v
origin	https://github.com/jackyzha0/quartz.git (fetch)
origin	https://github.com/jackyzha0/quartz.git (push)
upstream	https://github.com/jackyzha0/quartz.git (fetch)
upstream	https://github.com/jackyzha0/quartz.git (push)

$ git remote remove origin
$ git remote -v
upstream	https://github.com/jackyzha0/quartz.git (fetch)
upstream	https://github.com/jackyzha0/quartz.git (push)

$ git remote add origin [YOUR_REPO]
$ git remote -v
origin	[YOUR_REPO] (fetch)
origin	[YOUR_REPO] (push)
upstream	https://github.com/jackyzha0/quartz.git (fetch)
upstream	https://github.com/jackyzha0/quartz.git (push)
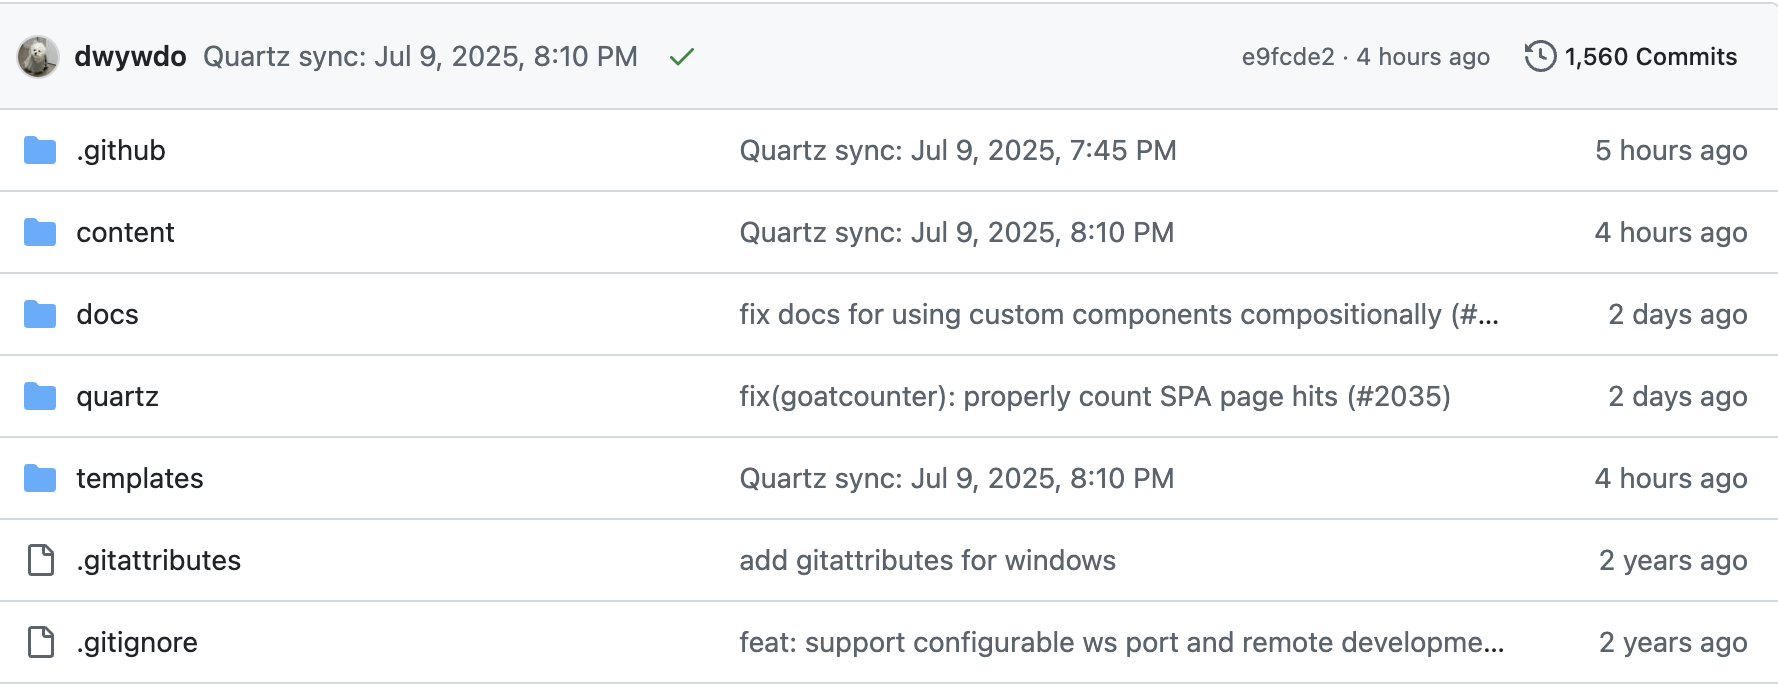
After then, sync the content in local environment to your repository
npx quartz sync --no-pullYou’ll be able to see the content of the quartz directory in your repository
5. Host with Github Pages using Github Actions
You can refer here to get the content of deploy.yml and detailed instructions
- Create a
deploy.ymlfile inquartz/.github/workflows/deploy.yml - Configure Github Actions
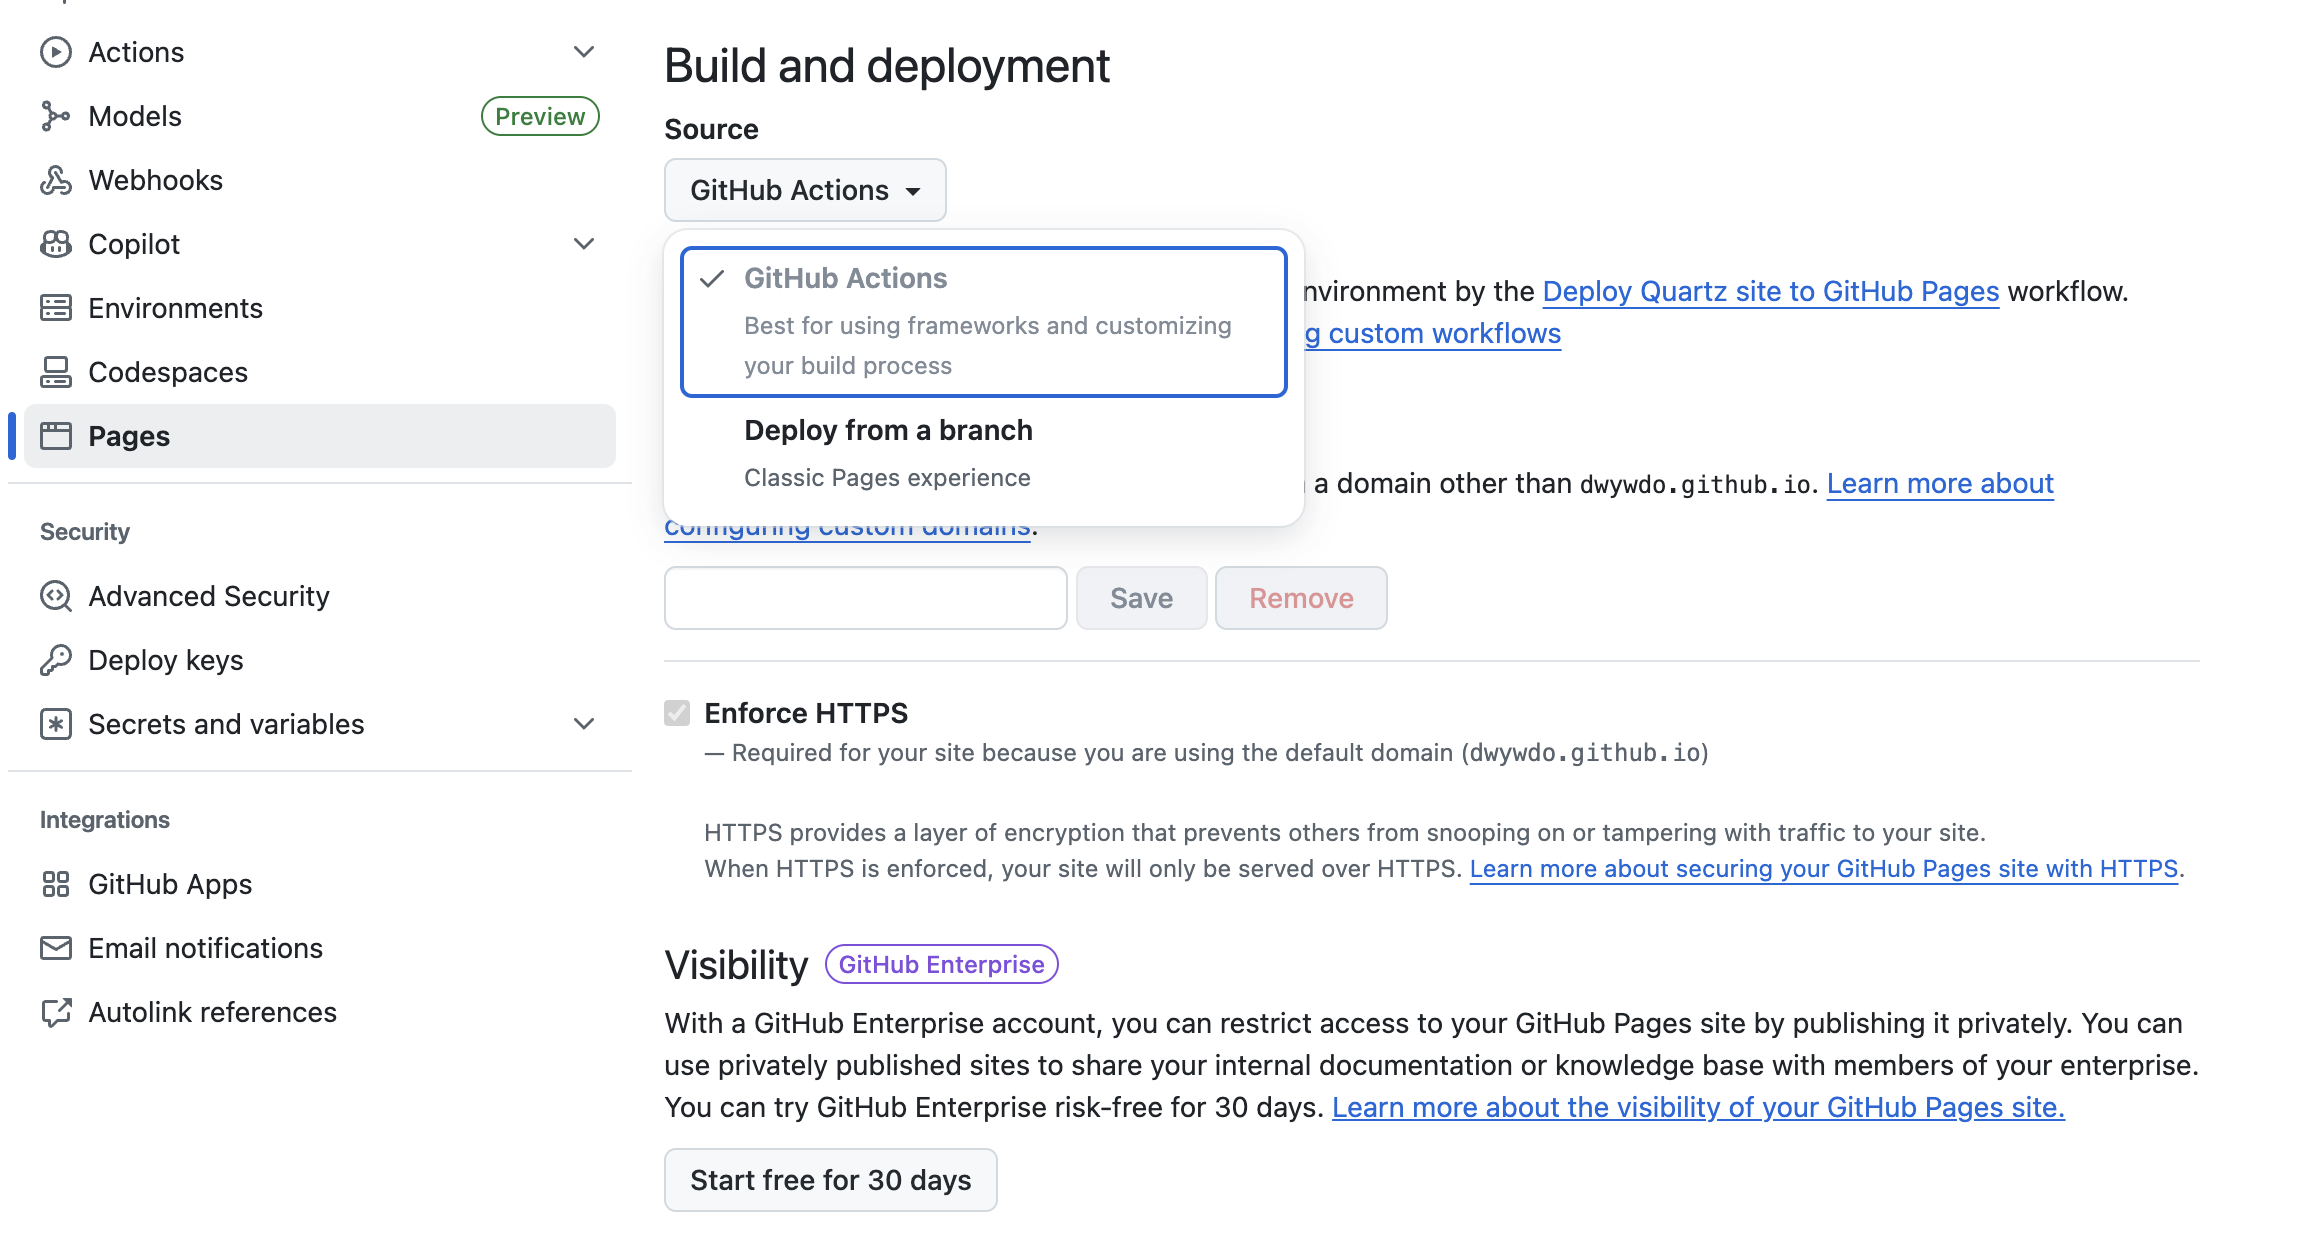
- Commit these changes by doing
npx quartz sync
Basic Commands
If you build and preview the content on your local environment.
$ npx quartz build --serve
# Visit http://localhost:8080/
If you want to sync the content on your hosted Github Pages.
$ npx quartz sync
# This will upload all changes with generated static resources
# and Github Actions will automatically deploy them
Conclusion
With this setup, You’ll complete creating and hosting a blog that maintains the Obsidian-based writing experience using Quartz and GitHub Pages.
Moving forward, I plan to consistently post on topics related to Digital Gardening, including:
- Useful Obsidian plugins (not just for blogging, but also for personal use)
- Various configuration and customization features of Quartz
- Personal thoughts on PKM (Personal Knowledge Management) / Second Brain and related ways to leverage Obsidian